The systems we build nowadays don’t really do a lot of computation, instead they communicate between services such as Database, REST API’s, etc. If you look deeper we are building a system that wait’s most of the time. We send a request to the server and we wait for the response. Microservices, Rest API that’s part of our daily life. So, What’s the problem with waiting ?
Whenever you perform an IO bounded operation in your service whether it’s an database or API call to other services the thread which is assigned to perform this operation will also get blocked. Also what if the service which we are calling is slow service and we don’t have any control over it. Over time you can quickly endup with only executors threads being blocked because just one of your services is slow. What we have now is that most of our code does not spend it’s time consuming CPU to do some work.
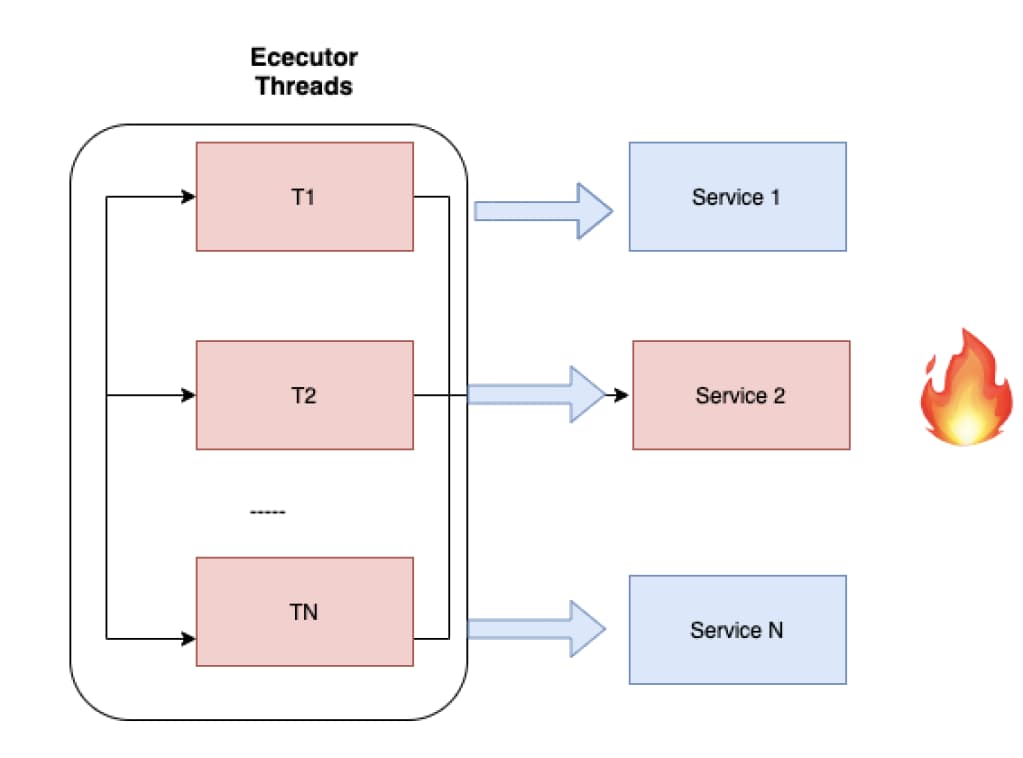
One can overcome this using asynchronous processing. The solution to the problem is instead of blocking a thread while you wait we release the thread in wait without blocking and whenever we get the response back then we find a thread to process the result. This asynchronous processing can be written in one of the following ways
- callbacks
- futures/promises/reactive
The problem with these approaches is that code becomes so messy that we need to deal with a lot of combinational/callback methods and also error handling becomes very difficult and in the end you will end up losing the business intent of the code. This is exactly where Kotlin coroutines can help us.
Table of contents
Open Table of contents
What are Coroutines ?
Coroutines are lightweight and cooperative multitasking systems where tasks voluntarily yield in order to allow other tasks to run. The beauty of Kotlin coroutines is developers can write concurrent code as sequential code.
Lightweight: Coroutines are not threads, We could easily create hundreds of thousands of them without running out of memory
Cooperative: The OS doesn't have to context switch as it does for threads. The coroutines can suspend and resume at any point of time, so they cooperatively progress. Also, they can be supervised and utilise channel to communicate.
Sequential Code: You can write concurrent code as non concurrent/sequential code. So code is more developer friendly and readable not like threads, async callbacks, futures, etc.
If we compared to regular Threads, Kotlin coroutines are very lightweight because thread has its own stack typically 1MB. 64KB is the least amount of stack space allowed per thread in the JVM while a simple coroutine in kotlin occupies only a few dozen bytes of heap memory.
import kotlinx.coroutines.*
//Start
fun main() = runBlocking {
repeat(100_00_00){ // launches one million coroutines
launch{
delay(10000) // Wait for 10 Seconds
print(".")
}
}
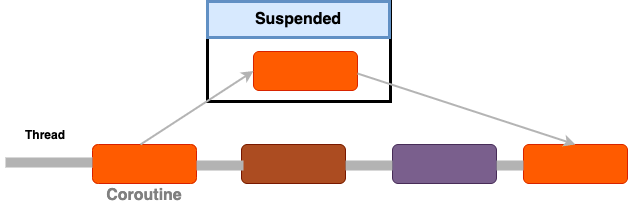
}The above code create’s a 100K coroutines, If we try to perform the same operation using java threads we will be getting OutOfMemoryError. Coroutines are also suspendable, meaning that when a coroutine is waiting for an external response (such as a network response or a device I/O) it becomes suspended and the Kotlin scheduler moves this coroutine off the thread. The same thread can then pick up other coroutines waiting to be executed. This way coroutines appear always to be executing concurrently (but may not be simultaneously). Also kotlin coroutines follows a structured concurrency which means new coroutines can only be launched in a specific coroutine scope hence there are clear entry and exit points.
Demo
This article is accompanied by a working code example on GitHub.
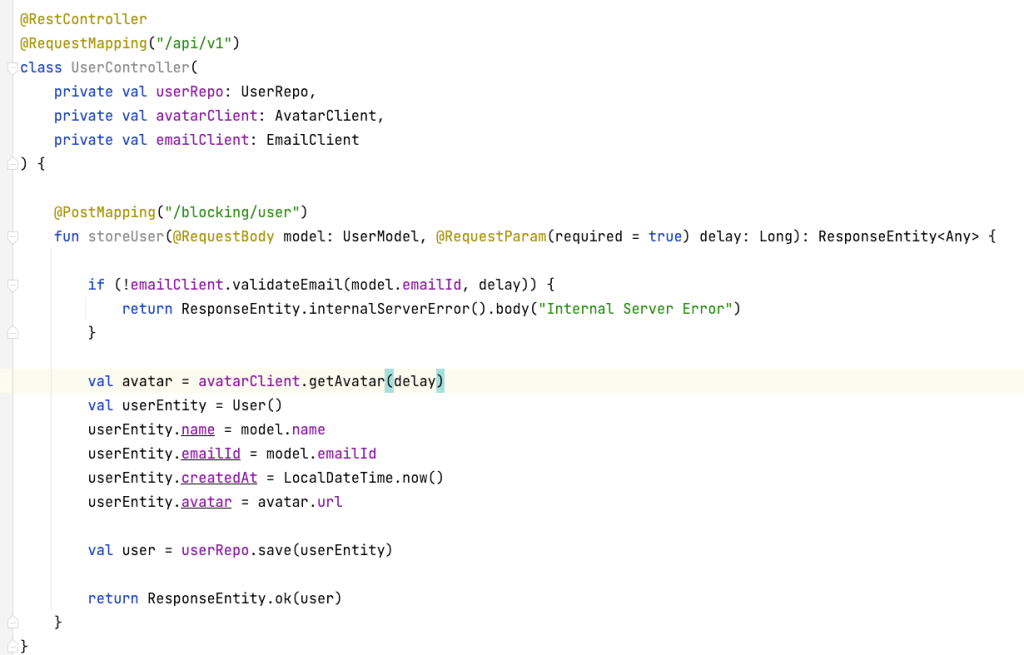
Let’s build a simple REST API to save the user details. We will be implementing in two approaches
- Thread Per Request(Spring MVC)
- Using Non Blocking Coroutines(Spring Reactive)
The API /api/v1/{blocking/coroutine}/user?delay=1000 takes name and emailId as request body and delay as http request param. The delay attribute is used to simulate IO blocking operations which will be passed to downstream API’s. Before saving the user details we invoke two more API’s.
- Email Validation API
- Random Avatar API
Both the API’s take the delay attribute as an input and wait's before sending the response. These two API’s are build in node.js as shown below
Validation and Avatar API
//Load express module with `require` directive
var express = require("express");
var app = express();

var images = [
  "https://www.clipartmax.com/png/small/204-2045046_there-appears-to-be-a-whale-on-the-bottom-docker-image-icon.png",
  "https://66.media.tumblr.com/6cf47a664464b02bff6c64ff959d4355/tumblr_pft74oWO4f1s3vdozo1_1280.jpg",
  "http://3.bp.blogspot.com/-A-bbtwJwI8s/Uek2HQvuFhI/AAAAAAAABQM/F91QmX3SLz0/s1600/220px-Tux.png",
  "https://www.add-for.com/wp-content/uploads/2017/01/octocat-wave-dribbble.gif",
  "https://typelevel.org/cats-effect/img/cats-logo.png",
];

function isNumeric(n) {
  return !isNaN(parseFloat(n)) && isFinite(n);
}

//Define request response in root URL (/)
app.get("/avatar", function (req, res) {
  var avatar = {};
  var randomId = Math.floor(Math.random() * images.length);
  avatar.url = images[randomId];
  var delay = req.query.delay;
  if (delay && isNumeric(delay)) {
    setTimeout(function () {
      res.send(avatar);
    }, delay);
  } else res.send(avatar);
});

app.get("/email", function (req, res) {
  var echo = req.query.value;
  var delay = req.query.delay;
  if (delay && isNumeric(delay)) {
    setTimeout(function () {
      res.send(echo);
    }, delay);
  } else res.send(echo);
});

//Define request response in root URL (/)
app.get("/*", function (req, res) {
  console.log(req.originalUrl);
  var delay = req.query.delay;
  if (delay && isNumeric(delay)) {
    setTimeout(function () {
      res.send("delayed  OK: " + req.path);
    }, delay);
  } else res.send("OK " + req.path);
});

//Launch listening server on port 8081
app.listen(8081, function () {
  console.log("app listening on port 8081!");
});
Now let us define the entities and controllers. The complete code is available in the github link mentioned above.
Entity:
Entity
@Table(name = "user")
data class User(

    @Id
    var id: Long? = null,

    var name: String?,

    @Column("email_id")
    var emailId: String?,

    var avatar: String? = null,

    var createdAt: LocalDateTime? = null,

    var updatedAt: LocalDateTime? = LocalDateTime.now()

)
Thread Per Request
Coroutines
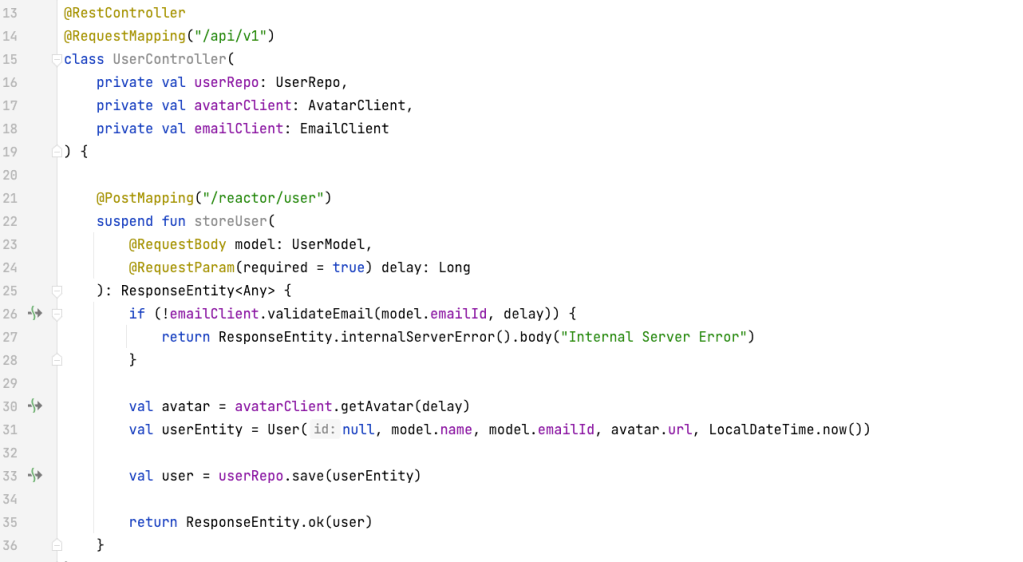
Here we are marking storeUser as a suspend(more on this below) function and the IDE is showing there are three suspension points(Non blocking IO calls) line no 26(validate email API), 30(avatar api) and 33(saving user details in db).
Since we are using coroutines here, the async code looks sequential and imperative, if we don’t rely on coroutines then we may end up writing a lot of functional/combinational callback methods(map, flatMap, etc) where the business intent will be lost or difficult to understand.
Benchmarks
We are using Vegeta as load testing tool and we will benchmark with following parameters
- Duration = 60 Seconds
- Rate = 30 Requests Per Second
- Total = 1800 Requests per min
- Delay = 4000(4 S)
Thread Per Request

Coroutines

The numbers speak for itself as you can see coroutine implementation is better than traditional thread per requests and the beauty is we are still writing imperative/sequential code.
Coroutines under the hood
Now let us try to understand the internals of coroutines. Kotlin Coroutine mainly works with the following three concepts
- Continuations
- Suspension Points
- State Machine
Let us understand these concepts with an minimal example
import kotlinx.coroutines.*

data class User(val id: Long, val name: String)

data class Post(val id: Long, val data: Any)

data class Comments(val id: Long, val postedBy: String, val comment: String)

object CoroutineFun {

    @JvmStatic
    fun main(args: Array<String>) = runBlocking {
        val user = User(1, "John")
        val postId = 2
        println("Fetching post $postId and comments for ${user.name}")

        val posts = fetchPost(user.id, postId)
        println("Posts = $posts")

        val comments = fetchComments(posts.id)
        println("Comments = $comments")
    }

    private suspend fun fetchPost(id: Long, postId: Int): Post {
        delay(1000)
        return Post(1, "Dummy Post")
    }

    private suspend fun fetchComments(id: Long): List<Comments> {
        delay(100)
        return listOf(Comments(1, "Anny", "Dummy Comment"))
    }
}
In the above code block we are simulating fetching a post and its related comments of the user John. Here the function fetchPosts and fetchComments is marked as suspend which shows this is a non blocking function. A function that is tagged with suspend keyword can started, paused, and resumed at any given point of time.
Continuations
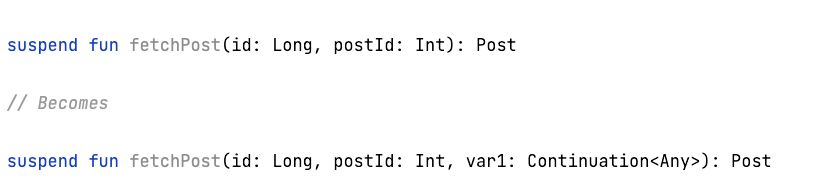
Every suspend function is transformed by the compiler to take a Continuation object. In the above case, fetchPosts and fetchComments suspend functions will be transformed to take a Continuation object when compiled, i.e .fetchPosts(continuation). So we save all the state (like local variables, etc.) within this Continuation object and pass it to the suspend function. Similarly, all other suspend functions and blocks get transformed to take a Continuation object as well.
Continuation, as the name suggests, encapsulates the current state and also the information about how to continue from a particular suspension point later on.
A suspension point in the code is like a check-point, at which the current state (like local variables, etc.) can be saved (inside a Continuation) to be resumed later on from where we left off. Everything that follows a particular suspension point (lines of code after the suspension point) is also saved within the Continuation object and passed on to the compiled suspend function for later execution.
Suspension Points
The Kotlin compiler converts the suspension points into states. In the above code block we have two suspension points(fetchPosts and fetchComments) and this is where the execution of the coroutine can be suspended and then resumed later. Now that we have identified, two suspension points in the above code, let us have a look at how these suspension points get transformed into different states using labels.
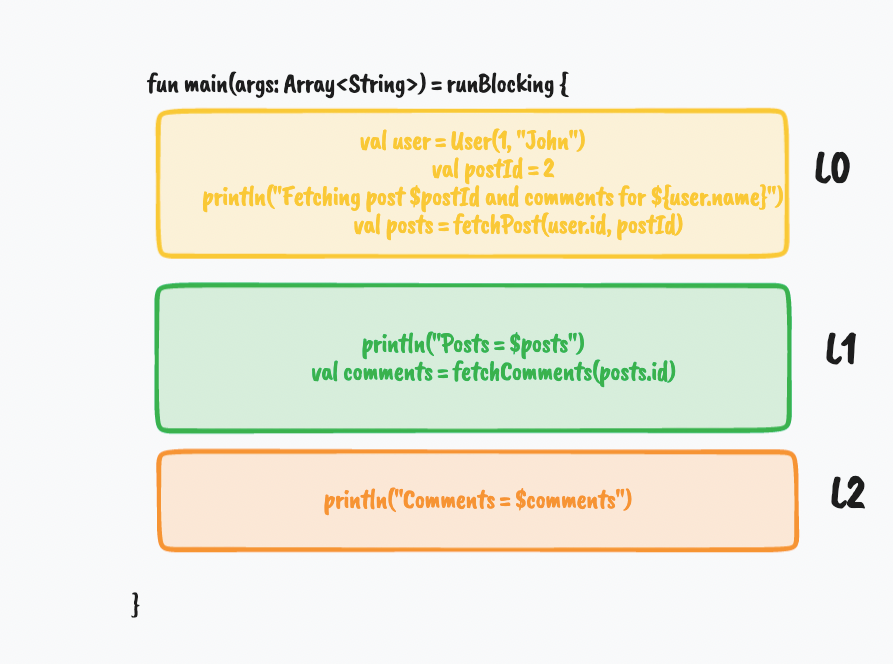
Everything above and including a suspension-point is transformed into a state by the compiler. Everything below the suspension point until the next suspension point or till the end of the suspend function gets transformed into another state.
So, we will have three states as shown above, i.e
- L0: until the first suspension point
- L1: until second suspension point
- L2: until the end
A special object Continuation will be injected into the suspendable functions like fetchPosts() and fetchComments()

Now, using these three states as labels, a Continuation state-machine is generated, which can resume execution from any of the states. Here is how the Continuation interface looks like :
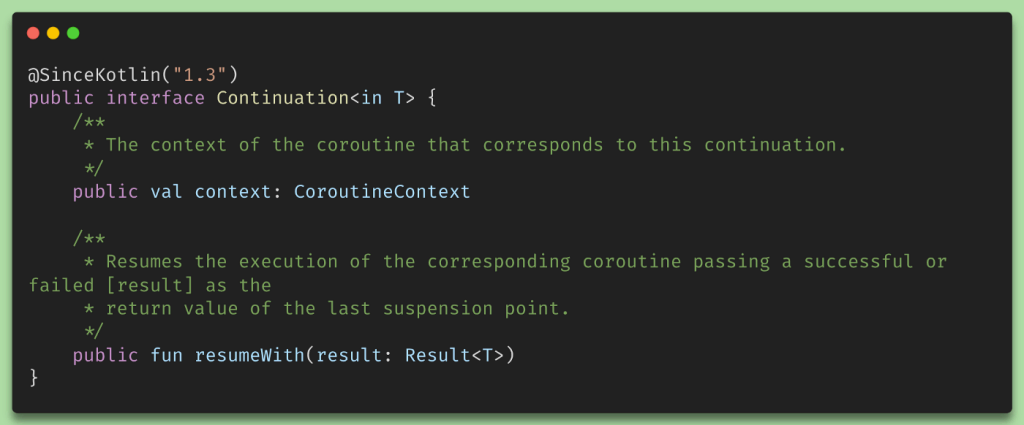
Now, let us have a look at the pseudo-code from the generated Continuation state machine implementation by the compiler
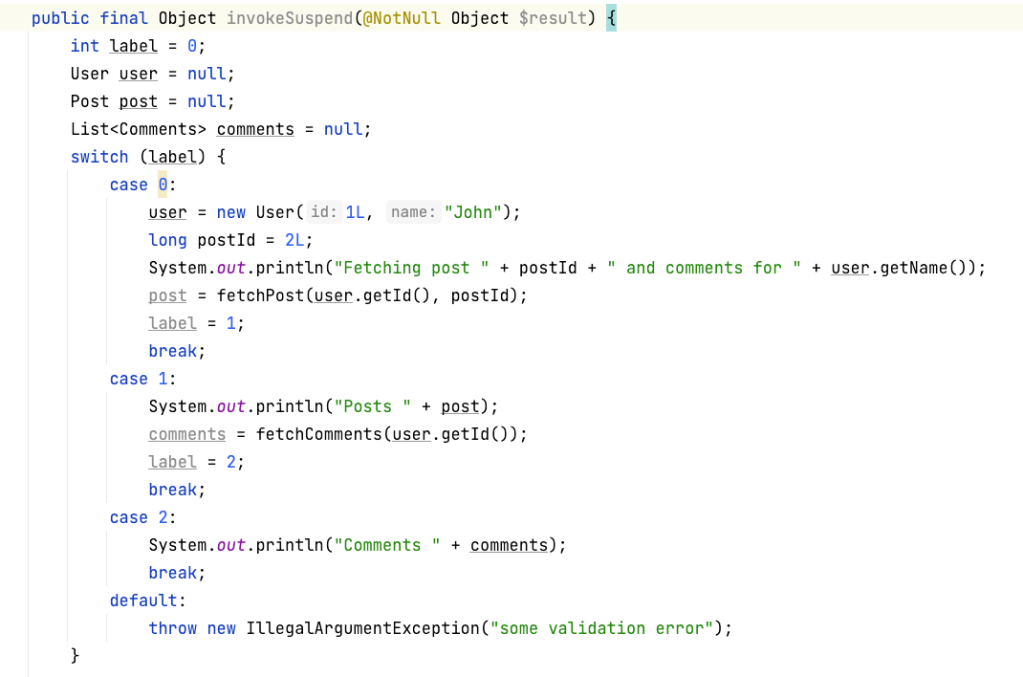
Each state is generated as a label and the execution can goto a particular label when resumed. Generated Continuation state machine implementation contains a field holding the current state, i.e. label, and all the intermediate data, i.e. local variables shared between different states.
When the coroutine is started, resumeWith() is called with label = 0, and we enter the L0 state as shown in the figure below :
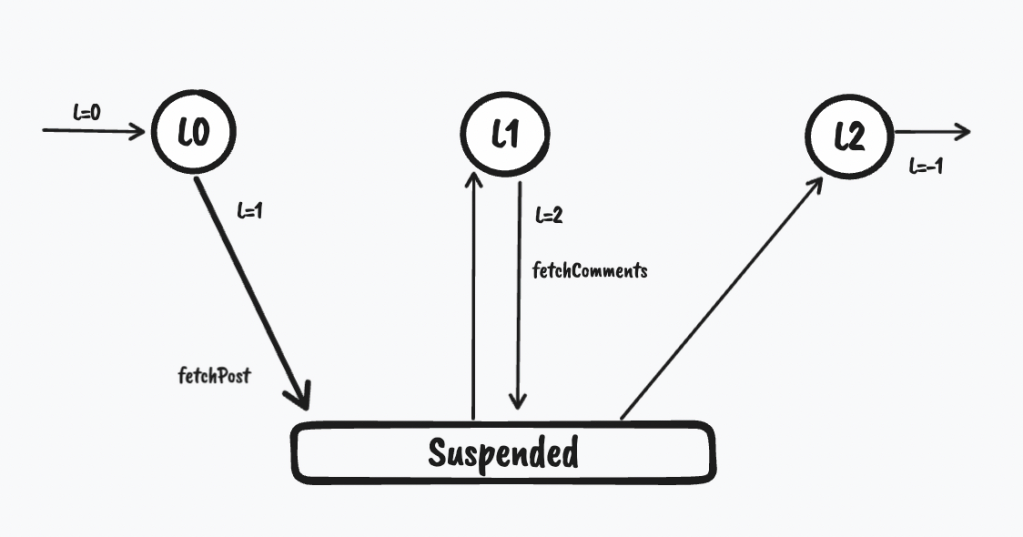
After calling fetchPosts the coroutine is suspended so the label will be set to 1 from 0. Similarly when fetchComments gets suspended we will update the label to 2 from 1. As you can see the code appears to us as sequential and behind the scenes it utilizes state machines to suspend and resume execution at various suspension points when needed.
Conclusion
- With the help of coroutines we can write the non blocking code using imperative/sequential style.
- Coroutines are resumable tasks that are lightweight to create and schedule.
- We also know when and how a coroutine suspends during its execution.